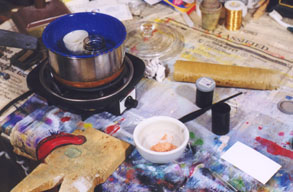
fig. 4
| Depicted are
the double boiler with a jar of honey
and a sake cup inside, a roll of fish glue, the ceramic
mortar for grinding and mixing, a modern quill pen and 35 mm film
jars which hold the jelled hide glue and the pre-mixed bulk former. The most difficult part of such an illustration is the gilding. Normally, there would be text on the verso (back) side of the page and little illumination, but for Tournaments Illuminated I had a whole back cover to paint. If I gilded the recto (front) side first, it would be face down while I painted the verso, and that might damage it. But if I painted the verso first and then gilded the recto, the pressure of my burnisher might damage the paint film. So I decided to gild the recto before painting, and to protect the gold I would tape a page of glassine paper over it. |

|
Gold is stuck onto the page by laying it on a thick ground called gesso (see fig. 6). I used a gesso recipe based on one which dates from the anonymous Naples MS XII.E.27, known as De Arte Illuminandi. It dates from the end of the 14th c., which makes it later than the style I am emulating, and from a different region, but since the gilding recipe is very simple, and there were so many different recipes, I felt that itís use was justified. This recipe contains hide glue which has been pre melted into water at a 1 part glue to 14 parts water ratio, some dry powdered Armenian Bole, some honey, and some slaked plaster of paris. I began with a double boiler which I used to melt the hide glue. You never want to boil hide glue, and you reheat it as few times as possible, or it loses adhesiveness. I can store the melted hide glue for a very long time in an airtight jar in the refrigerator. It will keep as a gelatin. I also use the double boiler to warm some honey to the point where it will flow in an eye dropper. I pre-mix and slab grind 4 parts of slaked plaster with one part of a soft clay called Armenian Bole and store that in another 35mm film jar. It is important to grind on a slab rather than in a mortar because a pestle will not reduce everything to a uniform fineness. Instead of slaked plaster one may use calcium sulphate (CaSO4), chalk, sea shells, egg shells, or even fine marble dust. If you use plaster (which is roasted gypsum dust) it must be slaked or it will not be inert. Slaking is when you add a lot of water to the plaster and agitate it until the plaster has stopped combining wit the water molecules. Then it canít form a structure anymore. For this recipe I dumped a half tsp. of the pre-mixed plaster/bole into a small ceramic mortar with an equal amount of fluid, melted glue. Then I started by adding ten drops of honey, and ground the material until smooth. The honey makes the resulting gesso slightly flexible, and it allows it to become moist again when breathed upon.
|
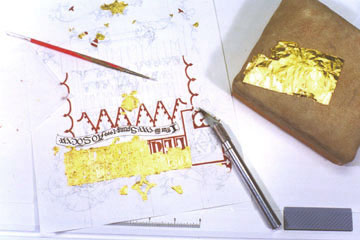
fig. 6
The gold being applied
|
Now the fun part. Gold leaf gets laid onto the gesso. I use 24 K gold leaf which I bought from a fellow medieval recreationist named John Rose. It was made in India at the same thickness of gold described in Cennino Cenniniís treatise, which is contemporary with De Arte Illuminandi. The gold is laid out on a suede pad and cut into manageable pieces with a dull knife. The gesso is carefully moistened by long, slow breaths, and the gold, carried on a small brush, is placed down and lightly pressed into the surface with a piece of glassine paper. Normally, you want a humid day for laying down the gold. Unfortunately, we had a temperature drop, and my house got very dry, so it was a bit difficult laying down the gold. But, I did it, and I left it overnight to dry. The medieval gilder used essentially the same process. Of course they had no glassine paper, but a piece of parchment made less adhesive with some bole or chalk powder would work. The burnishing comes next. I made my own burnisher out of an agate, some bone for a ferrule, and a piece of hardwood for the handle. You can see it depicted with the pens in the design page of this article. Ideally, you want to burnish gold when the day is dry, and if the weather hadnít turned rainy overnight, I wouldnít have had to add gold over nearly so many cracks, smudges, and tears! (these are known to gilders as ìfaultsî.) But I worked hard, and by the end of the afternoon I had a bright, shiny layer of gold over my picture. Then the rain stopped, the temperature dropped again, and the day turned dry. I must remember to check my family tree and see if there were any ancestors named Murphy.
|