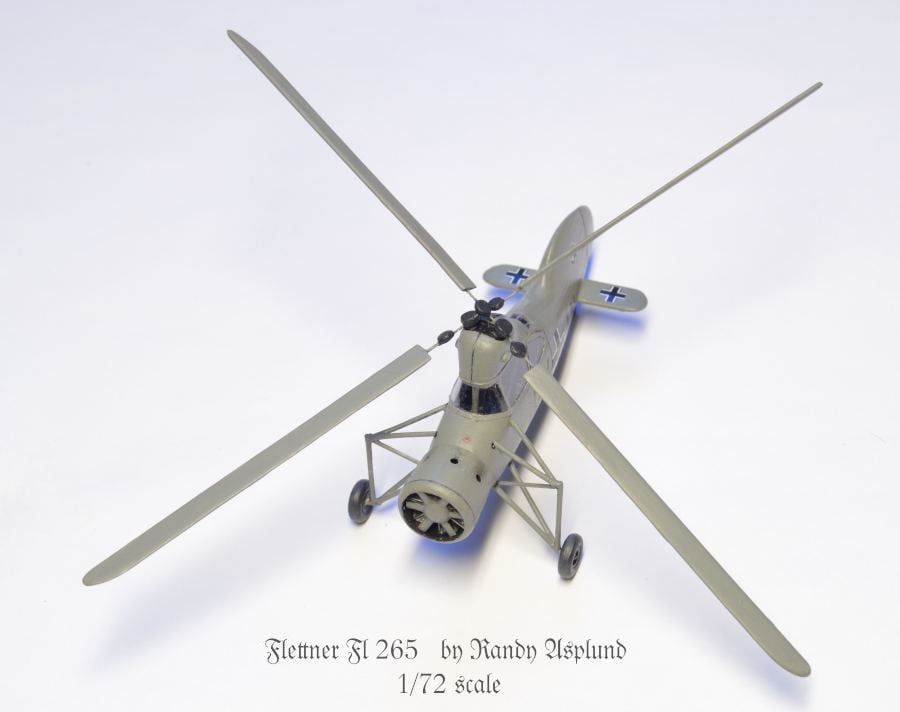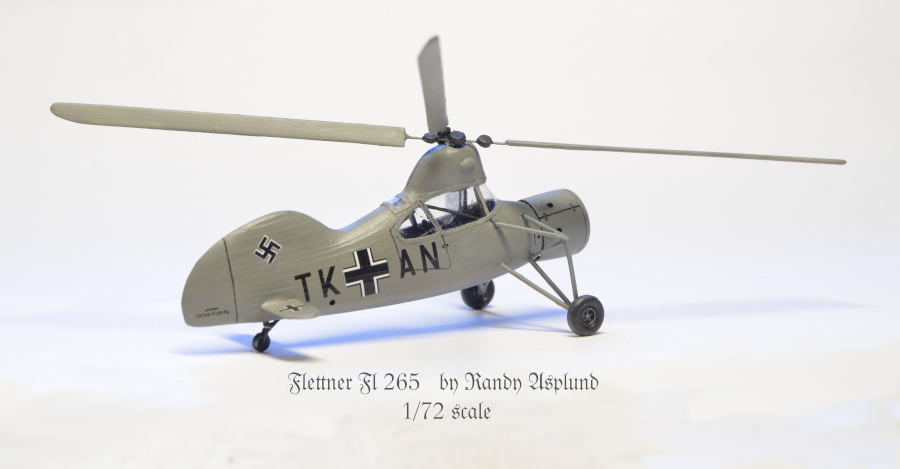
Flettner Fl 265
© Randy Asplund
I'm a
historical aviation buff. I especially like the early stuff, the more
historically innovative, and... the wacky. Ever since I was a kid I
have enjoyed building models of them, and I promised myself that after
I finished the last batch of painting commissions I would take down one
of the many boxes of kits laying around, and build it.
Once
upon a time, I bought a model of one of the earliest operational
helicopters, the Flettner 265. The real one is just over 20 feet from
nose to tail, and the 1/72 scale model is about 3-1/2 inches. The kit
didn't look too complicated, so I figured it would go pretty fast....
Uh, no. There were “issues.” The kit, by Special Hobby
(from the Czech Republic) is a combination of good attempts, but
lousy/lazy follow-through. There were several resin parts, which give
good detail, but the seat wasn't fully cast, and the canopy had
yellowed. It was that really thin vacu-formed kind of canopy, and was
not well defined, so cutting it out was guesswork. But being yellow, I
junked it anyway. One thing I hate about these kinds of kits is they
can' be bothered to provide all of the parts, and they make you
manufacture some. You better know what you are doing.
Making
some rods by stretching some plastic sprue over a candle is no biggie,
but the instructions give the wrong length. The maker couldn't be
bothered to provide locator pins on the parts, and some parts just
didn't fit. For example, the engine is too big for the cowling! And
they provide resin exhaust pipes that you are supposed to add to the
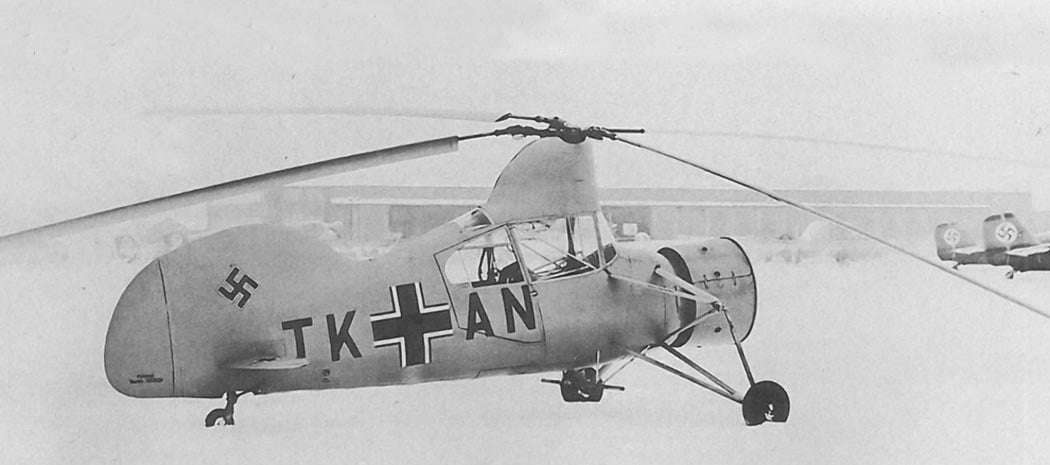
outside of the cowling... but the box cover and the existing photos
from my research clearly show they don't exist. The extant photo also
shows the decal of the Flettner serial number should be different, and
on the rudder, not the vertical stabilizer. Oh well, that's why you do
research.
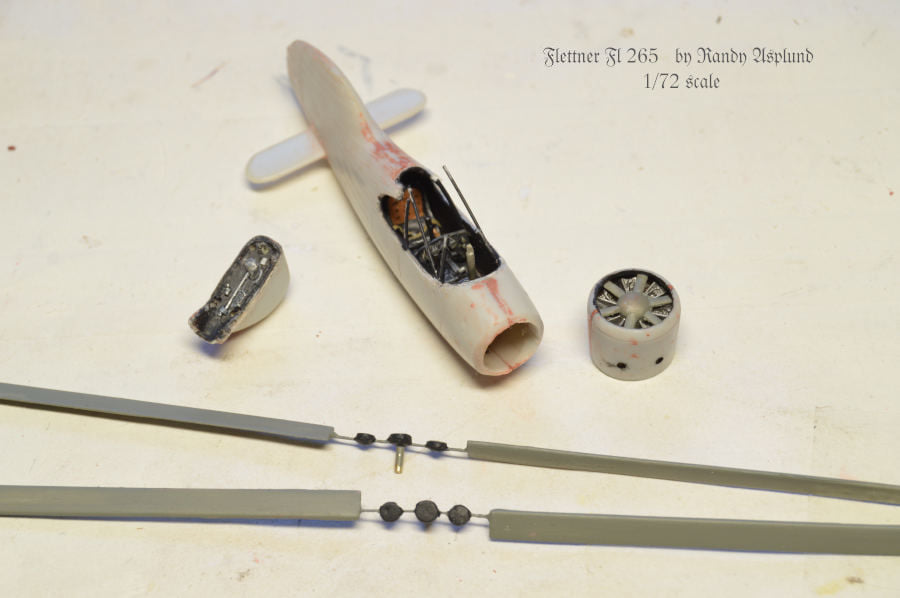
Whoops!
I broke a part! There are a lot of weak, flimsy parts in this kit. The
worst are the rotors. The rods that hold the blades are SKINNY as hell,
and guaranteed to have a short life expectancy. I plan to eventually
move to Sweden, so they would never survive packing. But it wasn't the
rotor that broke! It was the fuselage above the door, which connects
the gearbox above the canopy to the rest of the body. It broke right at
the little window on both sides. But that's fine because it allowed me
to do something better.
I
decided to make my rotors tough and removable. So I cut off the struts
that go to the blades, saving the control lever covers (little disks)
and replaced them with spring steel wire. I channeled out the underside
of the rotors and disks with a saw, epoxied them in, and covered it
with Bondo. I epoxied brass rod to the center to make the axles. These
would bayonet down into the top of the gear box and fitting snugly so
they can rotate, would be able to give rather than break if bumped, and
can be pulled out for packing. Oh, wait. These are supposed to emerge
from a large opening in the top! The maker didn't bother to mold that
detail. So I had to carve the plastic thin there to make a shallow
recess. Underneath I added drilled-out sprue to receive the axles. This
was heavily epoxied for strength.
After
the cockpit had been built and painted (much easier to assemble with
the gearbox OFF!), I cut a piece of brass rod to serve as the drive
shaft (goes up from a box on the cockpit floor to connect with the gear
box above the canopy). I carefully cut it to exactly the length
required, plus enough to file out a prong on each end that would
bayonet into drilled holes. Great, except that the length given in the
instructions was wrong. I had to remake it. But when finished and
epoxied together, this piece made a really sturdy upper structure above
the canopy.
The
canopy was a challenge since it was intended to fit an opening, but
there was no recess to prevent it from pressing through all the way
when you glue it in. I had to create a raised rim inside the window
openings, leaving just enough space for the clear pieces. Like putting
glass and a photo into a frame.When it dried, I put thin masking tape
over the window and marked the size and shape for the clear pieces.
This tape went onto some thin commercial packaging plastic, and was
carefully cut out. Fortunately the only pieces needing to bend were
easy to curve. I trimmed the canopy with 24 lb paper that had been
coated with clear acrylic medium before cutting.
There
are little bulges on the superstructure that had to be made, the box
art has some wrong details, like a grill that doesn't exist and the
door handle in the wrong place. The struts should NOT be RLM 66
(black-gray), they should be RLM 2 (medium yellowish gray). Colors were
mixed to conform to the color chip insert in Michael Ullmann's book
Luftwaffe Colors. I NEVER mix my colors with white to lighten them for
“atmospheric perspective.” Why? Because it is false color.
But also, that approach presumes a standard viewing distance, and if
you are at a different distance it doesn't work. I'm trying to make
historical miniatures. I'll save “atmospheric perspective”
for paintings, where it belongs.
The
tail wheel was all wrong and needed to have the struts cut off and
rebuilt. And they were too lazy to mold the opening, so they give
measurements (wrong again) for where to put it and how long it should
be cut. You get to invent something to mount the tail wheel struts
onto. I also had to bevel the nose right before it goes under the
engine cowling. That meant building brackets inside to mount the engine
cowling.
This
helicopter has its engine in front, like an airplane. And it looks like
it has a little toy propeller buried inside. That's actually a cooling
fan, but could Special Hobby be bothered to make the fan blades as fan
blades? Nah. They are just symmetrical hump sectioned with a flat rear.
One
thing I'll say that I liked about this kit are the decals. They are on
a very sturdy but thin film. They laid down perfectly and didn't tear
when being positioned. Going over a gloss lacquer and then a SPRAYED
dull coat on top of the decal, you don't see the film at all.
You
might want to know what's up with how the rotors are arranged. This
bird has a pair of counter-rotating rotors. They sit at shallow off-set
angles, so they look pretty wonky when stationary, but it is just the
way it is designed.
There
were only about five Fl 265s put into service as deck helicopters,
being used in 1939-40 on German Cruisers. They could lift small cargo
or rescue downed pilots. There is even a color movie clip of one
demonstrating and air-rescue of a dummy pilot from a raft. By the
Korean war helicopters were routinely doing these duties.